How to Install OpenClaw: Step-by-Step Guide (Formerly ClawdBot / MoltBot)

At PromptLayer, we track a lot of what's happening in the agentic AI space, and OpenClaw has become one the most talked-about projects among developers building always-on assistants. This guide walks you through getting it running on your machine, step by step.
What OpenClaw actually does
OpenClaw is a self-hosted agent gateway that connects large language models to your local system and messaging platforms. Unlike a standard chatbot that forgets you when you close the tab, OpenClaw runs as a persistent daemon - it can message you proactively, execute shell commands, manage files, and automate browser tasks across Telegram, Discord, or WhatsApp.
The architecture splits into two parts: the "Brain" (reasoning engine handling API calls and orchestration) and the "Hands" (execution environment running skills like shell access and file management). Your workspace directory stores configuration, memory files, and the agent's personality profile.
Getting your environment ready
Before installing, confirm your system meets these requirements:
- Node.js 22 or higher (check with node --version)
- At least 1 GB RAM for the gateway alone, 4 GB recommended for stable npm builds
- macOS, Linux, or Windows via WSL2
- Port 18789 available for the Control UI
For VPS deployments, allocate a 4 GB swap file if your instance has less than 2 GB RAM. The npm install phase can trigger out-of-memory kills without this buffer:
sudo fallocate -l 4G /swapfile
sudo chmod 600 /swapfile
sudo mkswap /swapfile
sudo swapon /swapfile
Picking your installation method
OpenClaw supports three main installation paths. Choose based on your comfort level and use case.
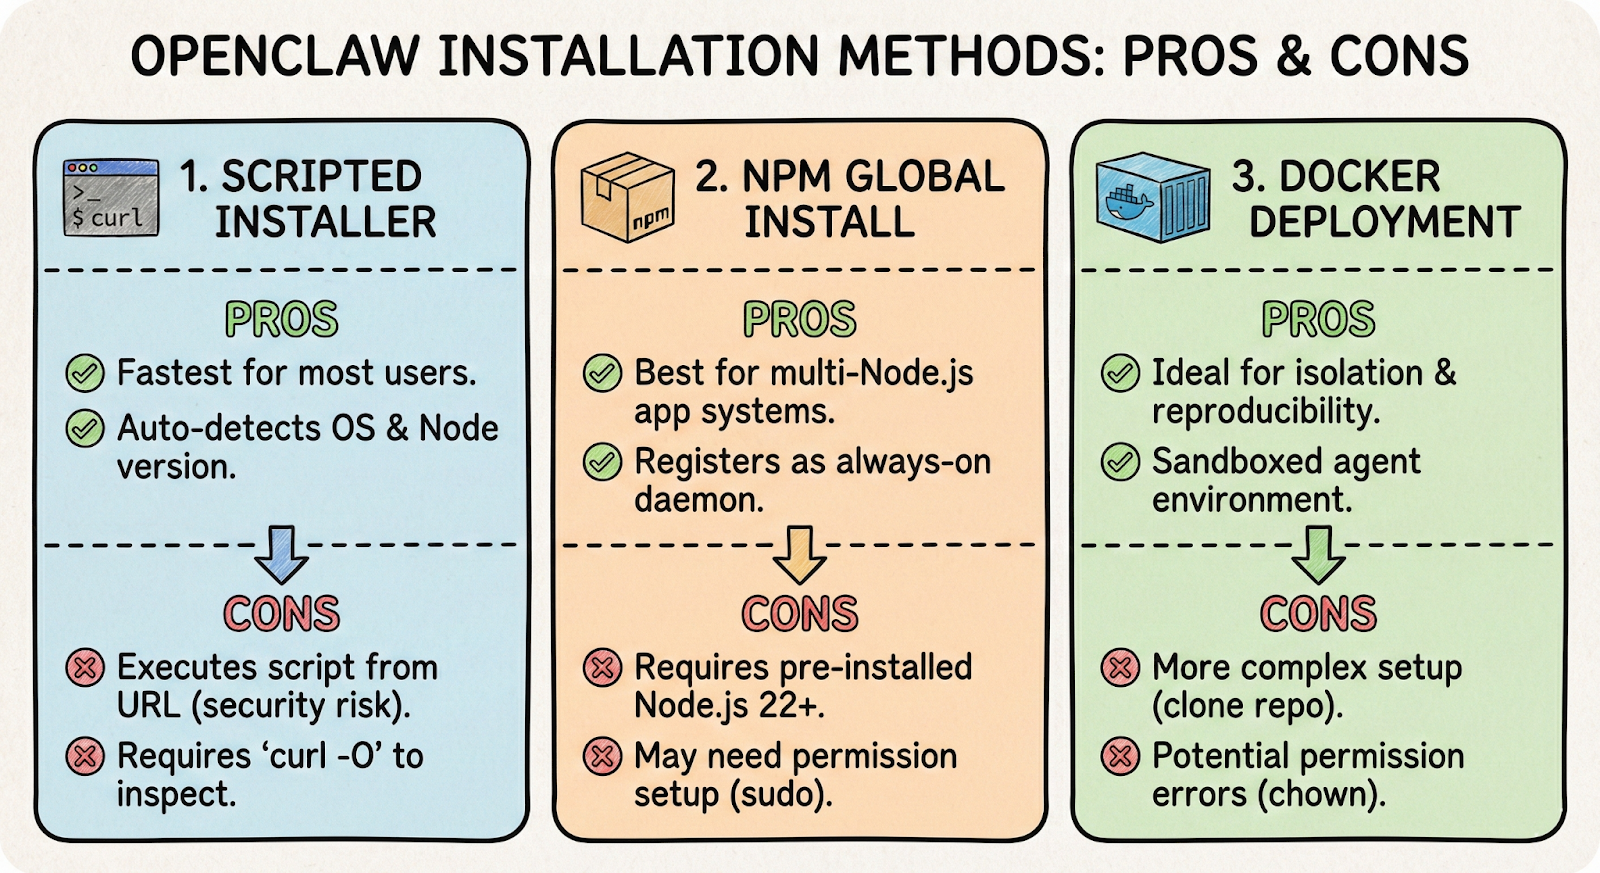
Scripted installer
The fastest option for most users. This script detects your OS, checks Node.js versions, and launches the onboarding wizard automatically:
curl -fsSL https://openclaw.ai/install.sh | bash
If you prefer inspecting scripts before execution, download it first with curl -O, review the contents, then run bash install.sh.
NPM global install
Better for systems running multiple Node.js applications:
npm install -g openclaw@latest
openclaw onboard --install-daemon
The --install-daemon flag registers OpenClaw as a background service - systemd on Linux, launchd on macOS. This ensures the agent survives reboots and stays "always-on."
Docker deployment
Ideal for isolation and reproducibility. Clone the repository and run the setup script:
git clone https://github.com/openclaw/openclaw
cd openclaw
./docker-setup.sh
Docker mounts two volumes: ~/.openclaw for configuration and credentials, and ~/openclaw/workspace as the agent's sandbox. If you hit permission errors, fix ownership on the host:
sudo chown -R 1000:1000 ~/.openclaw
Running through initial setup
After installation, the onboarding wizard (openclaw onboard) walks you through configuration. You'll make two key decisions here.
Selecting your model provider
OpenClaw works with multiple LLM backends:
- Anthropic Claude: Best for complex agentic tasks with strong instruction-following
- OpenRouter: Convenient for switching between providers without managing separate API keys
- Google Gemini: Useful when you need large context windows for codebase analysis
- Local models via Ollama: Maximum privacy, but requires 48 GB+ VRAM for effective 70B+ parameter models
Connecting messaging platforms
For Telegram, create a bot through @BotFather and paste the API token when prompted. Message your new bot, then approve the pairing code:
openclaw pairing approve telegram <CODE>
For Discord, create an application in the Developer Portal, enable Message Content intent, invite the bot to your server, and allowlist your user ID in the config.
When things go wrong
Most installation problems fall into a few categories:
- Gateway not responding or "0 tokens used": The daemon stopped or API authentication failed. Run openclaw gateway restart and verify your API keys.
- "RPC probe: failed": Port 18789 is blocked. Find the conflicting process with sudo lsof -i :18789 and terminate it.
- "Access not configured": Your user ID isn't allowlisted. Run the pairing approve command with the code from your messaging bot.
- EACCES errors in Docker: The Node user (UID 1000) lacks permission to mounted volumes. Fix with the chown command above.
Use openclaw doctor for automated health checks and openclaw logs --follow for real-time debugging.
Keeping your setup secure
Running an agent with shell access and file permissions creates a real attack surface. OpenClaw can read untrusted text from the web or group chats, prompt injection a genuine risk.
Reducing exposure
- Run the gateway in Docker or a dedicated VM to limit damage from compromised agents
- Enable explicit consent mode (exec.ask: "on" in config) to require approval before write or exec commands
- Grant only read-only access to sensitive directories initially
Protecting the Control UI
The web interface on port 18789 grants full agent control. Never expose it to the public internet without authentication. Recommended approach uses Tailscale:
gateway:
tailscale:
mode: "serve"
This keeps the port bound to localhost while making it accessible only through your private Tailscale network.

Make it “always-on” without making it “wide-open”
You installed a long-running, high-privilege gateway, not just a CLI. Treat it that way - keep the daemon healthy (openclaw doctor + openclaw logs --follow), treat ~/.openclaw like a password vault, and don’t ever leave the Control UI hanging out on the public internet.
Now do the fun part - pick one real workflow and wire it up end-to-end (one chat platform, one model, a small workspace). Start with consent mode on, tighten permissions, and expand only when you trust what it can do. That’s how OpenClaw becomes genuinely useful - persistent, proactive, and controlled on your terms.