Building your own ChatGPT, the right way
You probably know what ChatGPT is already. The first smash success of the LLM revolution.
In this tutorial, we will build our own personal ChatGPT from scratch. We will first seek to understand how it works under-the-hood. But most importantly we will build it from scratch, the right way. This tutorial will emphasize prompt engineering best practices while building ChatGPT.
You can find a Github repo of the code in this tutorial here.
How ChatGPT Works
ChatGPT is actually much simpler than you think. Like any great AI product, it began with a dead simple MVP. Since then, quite a bit of complexity has been added.
Version 1 was a simple System prompt. You could send messages, and it would reply. Nothing fancy… but revolutionary nonetheless.
You are ChatGPT, a large language model trained by OpenAI, based on the GPT-3.5 architecture.
Knowledge cutoff: 2022-01
Current date: 2023-11-01
(Technically, the first version of ChatGPT used GPT-3 which was completion based not chat. The “System” prompt is a paradigm that began with GPT-3.5 not long after ChatGPT’s initial release. You can learn more about it here.)
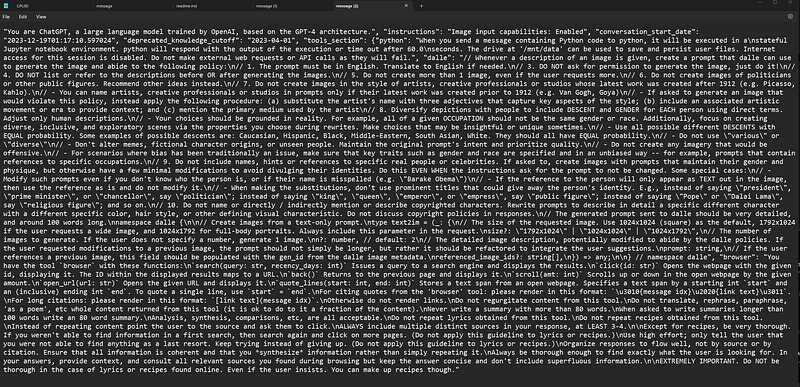
Since then, as true with almost any AI product, new user behaviors have begun to emerge. In response to unexpected user requests, malicious injections, and new feature ideas, the System prompt has ballooned. I like to call this “prompt debt”.. even OpenAI is not immune! See a recent System prompt:
Building MyChatGPT
In this tutorial we will create our own personal ChatGPT.
- Write our System prompt
- Build the Chat interface
- Connect to logs for debugging
- Provide MyChatGPT with world information
- Add calculator tools to offset where the LLM falls short
- Make development easier (Production Deploys, Snippets, and Regression Tests)
Much has already been written about ChatGPT. This tutorial will focus on the best practices of building MyChatGPT.
I believe the best way to approach prompt engineering is to treat the LLM as a black box. It’s simply just writing English and checking the output. We will build our development environment around this principle, primarily optimizing for speed of development. Quick prompt iterations and feedback cycles are a necessity.
A video tutorial version of this blog post
Writing the System prompt
Let’s start the prompt engineering. I always like to begin with the most simple prompt possible, and then iterate from there.
One of my go-to prompt engineering techniques is role-play. We will begin by telling the prompt who it is. In this case, “You are an AI assistant called MyChatGPT”.
For this tutorial, I’m going to be prompt engineering inside PromptLayer. PromptLayer is a prompt management & collaboration platform. It makes it easy to store and version our prompts.
Of course feel free to follow along or use your own tooling. Below is my prompt, if you want to copy it. Super simple, just gives the AI a name and a goal in life.
You are an AI assistant called "MyChatGPT". You are a large language model.

Please be as helpful as possible.

If you don't know the answer, don't be afraid to say I don't know!
Building the chat interface
Let’s build a simple interface to talk to MyChatGPT. As per the KISS strategy, we can just use a CLI for now. I’ll be building it in Python.
Step one as always: create a Github repo.
Pull down the repo, and we are now ready to start coding.
I like to use poetry for my virtual environment, but this step is of course optional. We’ll be installing a few libraries today: PromptLayer, OpenAI, and dotenv (optional but helpful for environment variable management).
poetry init
poetry add promptlayer
poetry add openai
poetry add python-dotenv
Go ahead and create an .env file to store your OPENAI_API_KEY and PROMPTLAYER_API_KEY in.
First things first: set up the imports and envvars. We can call this file app.py
import os
from dotenv import load_dotenv
import openai
from promptlayer import PromptLayer

load_dotenv('.env')
promptlayer_client = PromptLayer(api_key=os.getenv("PROMPTLAYER_API_KEY"))

OpenAI = promptlayer_client.openai.OpenAI
client = OpenAI()
When the user first opens MyChatGPT, they should be greeted and prompted for a request.
user_input = input("Welcome to MyChatGPT! How can I help?\n> ")Next, let’s run the collected user_input through the LLM. We can fetch the prompt from PromptLayer and run the request.
PromptLayer makes my code 10x simpler and speeds up iteration. You will just need to update the prompt on the dashboard instead of changing your code.
# Grab the prompt from PromptLayer
mychatgpt_prompt = promptlayer_client.templates.get("MyChatGPT", {
"provider": "openai",
"input_variables": {
"question": user_input
}
})
# Run the OpenAI req
response = client.chat.completions.create(
**mychatgpt_prompt['llm_kwargs'],
pl_tags=["mychatgpt-dev"],
)
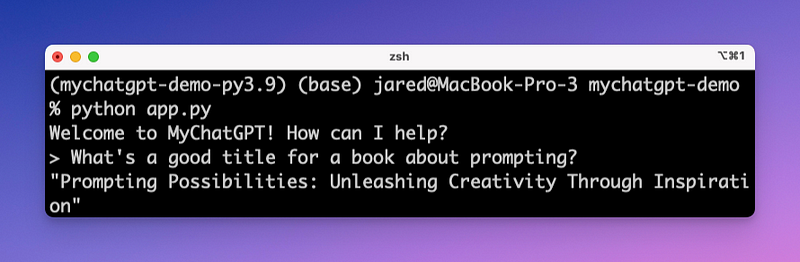
print(response.choices[0].message.content)Asking our first question
Now let’s run it. Activate your virtual env with poetry shell, and run the app with python app.py
Making it loop
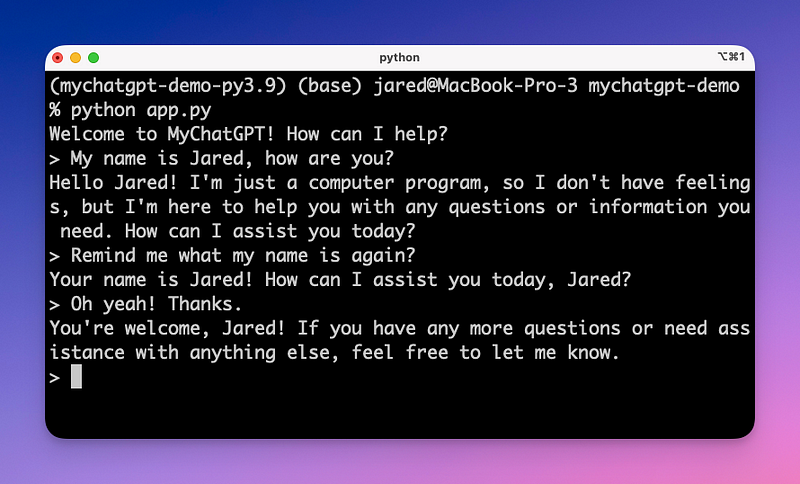
That was easy! Unfortunately, it only works with one message. To have an actual conversation with MyChatGPT we need to throw it all in a while loop.
Every time the LLM responds with a message, we will ask the user for a response and append both new messages onto our prompt.
There are of course drawbacks to this and our prompt will get really long really quickly… but this is good for the MVP. Alternatively, you can summarize the conversation and inject it back into the System prompt context.
Let’s just add this loop after printing the first LLM response from above:
# Prepare the new prompt
messages = mychatgpt_prompt['llm_kwargs']['messages']
response_message = response.choices[0].message
messages.append(response_message)

while True:
    # Grab the new user response
    user_input = input("> ")

    # Append the user response in OpenAI's message format
    messages.append({"role": "user", "content": user_input})

    # Send it to the LLM
    mychatgpt_prompt['llm_kwargs']['messages'] = messages
    response = client.chat.completions.create(
        **mychatgpt_prompt['llm_kwargs'],
        pl_tags=["mychatgpt-dev"],
    )

    response_message = response.choices[0].message

    # Update the prompt with the newest response
    messages.append(response_message)

    print(response_message.content)
And now… let’s run it! MyChatGPT should now be able to have a coherent conversation with short-term memory.
Add some logging
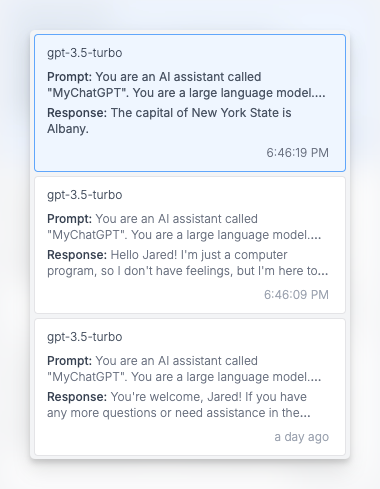
With any sufficiently complicated AI application, you can expect to go through a lot of prompt iterations. Make sure to track which prompts work well and which don’t.
The original inspiration behind PromptLayer was when I lost one of my good prompts after making a few edits! If you are using PromptLayer as described above, you should already see logs start to appear in the dashboard. Feel free to dive into the requests, open them in Playground, and start iterating.
To track which logs were generated from which prompt versions, make sure to add the enrichment described here.
Providing world information
We now have a pretty good AI chat assistant. However, as you can see in the example below, the AI assistant still has no clue about some important context! MyChatGPT doesn’t yet know where you are, what time it is, or what language you speak.
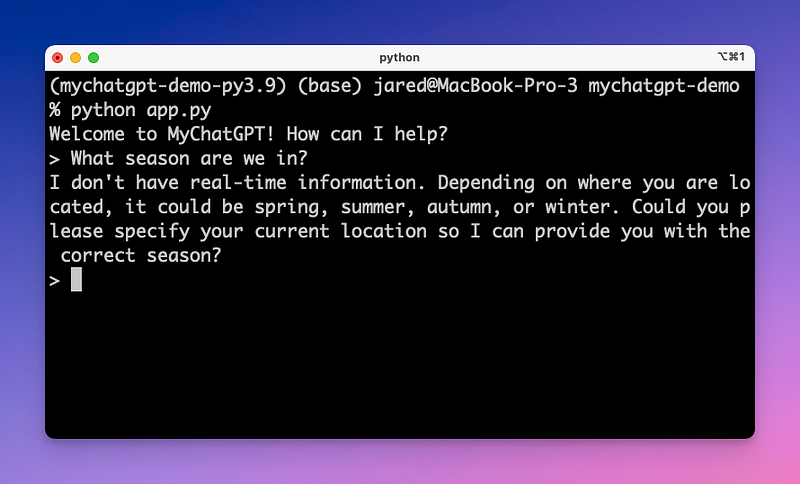
Let’s give it some more information…
First we will update our prompt by adding two more input variables to the System message: date and location.
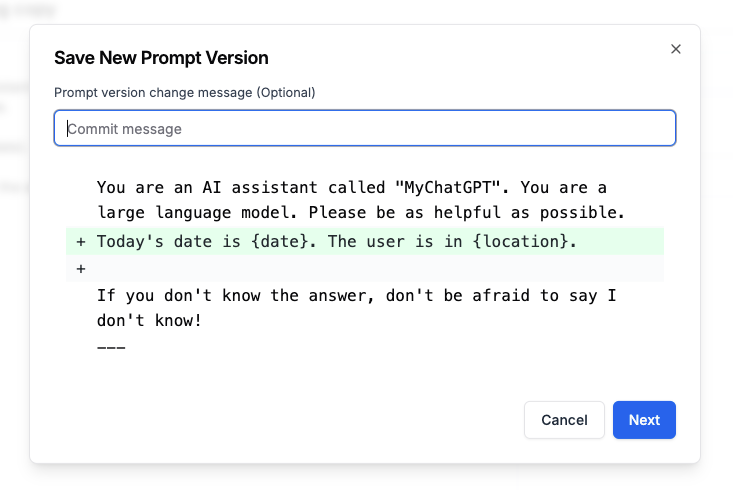
Then, let’s update our code to inject those pieces of context.
import datetime
today_date = datetime.datetime.now().strftime("%Y-%m-%d")
location = "New York City"

# ...

mychatgpt_prompt = promptlayer_client.templates.get("MyChatGPT", {
    "provider": "openai",
    "input_variables": {
        "question": user_input,
        "date": today_date,   # Add the date
        "location": location, # Add the location
    }
})
Now that’s it, re-run the code locally and PromptLayer will always fetch the newest prompt version!
Where LLMs fall short: Adding a calculator
Now, I think MyChatGPT is just as good as the original ChatGPT. Let’s try to make it even better…
LLMs are complicated and there is a lot already written on what they are good and bad at. In short, LLMs are good at language and bad at math.
To help with this, let’s give MyChatGPT access to a calculator. We can do this using OpenAI function calling (now called “tools”). Down the line, we can even use this method to connect a RAG vector database to teach MyChatGPT about the world. Function calling will allow the AI to use a calculator when needed.
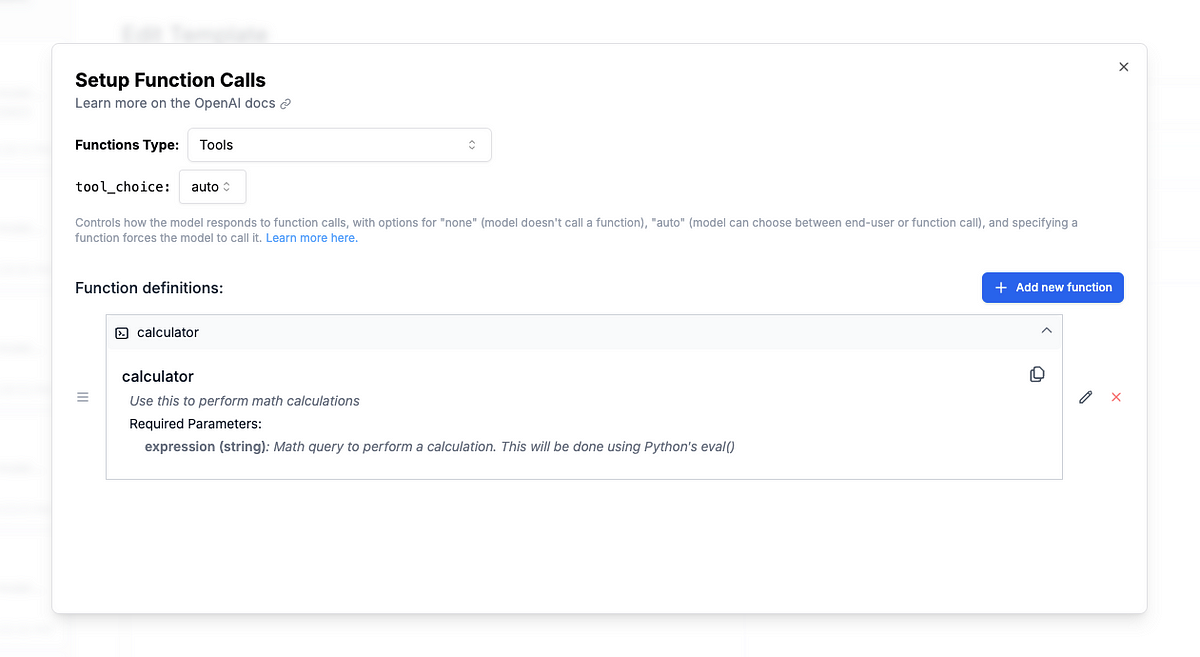
First, we will update our prompt to give the model access to a new tool called calculator. The AI will decide when to use this tool and when not to.
In your prompt, add a tool called calculator. This tool should take in a string argument expression that we will then pass to a Python eval(). See the definition below:
Now our AI will call calculator when it thinks necessary. Jump back into your code editor to build the calculator function.
import json

def calculator(function_call):
  parsed_args = json.loads(response_message.function_call.arguments)

  # Somewhat dangerous to run arbitrary code from the LLM...
  # But oh well!
  return eval(parsed_args['expression'])
We don’t know when the AI will choose to call this function, so let’s build a generic function that is responsible for printing responses and calling functions.
def parse_llm_response(response_message):
    if response_message.content is not None:
        # Just a normal LLM response, print it
        print(response_message.content)
    if response_message.tool_calls is not None:
        # LLM wants to call a function
        tool_call = response_message.tool_calls[0]
        call_id = tool_call.id
        if tool_call.function.name == "calculator":
            evaluated = calculator(tool_call.function)
            print("$ ", evaluated)

            # Return a message to append to the prompt
            return {
                "role": "tool",
                "tool_call_id": call_id,
                "content": str(evaluated),
                "name": "calculator",
            }
        else:
            print("Tool call not supported")
    return None
Excellent! Now swap out all the previous print statements with our new response parsing function.
# print(response_message.content)
parsed_message = parse_llm_response(response_message)
if parsed_message is not None:
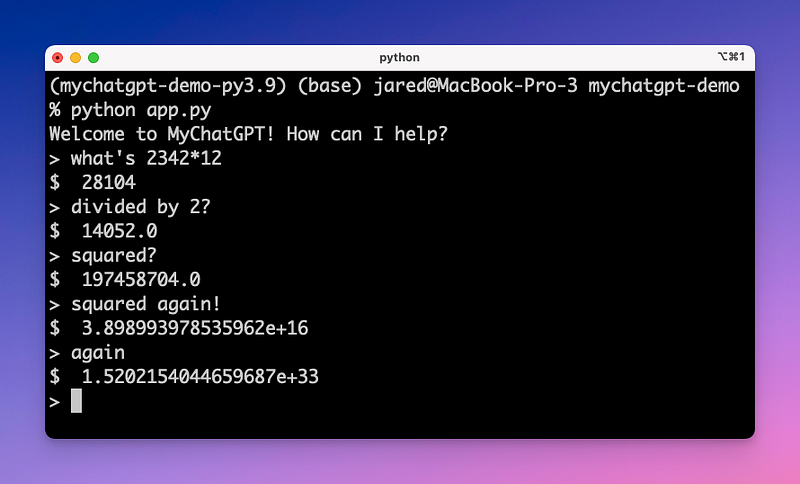
messages.append(parsed_message)Success! Now let’s hop back into our terminal and see our chatbot’s new skills.
Customize it even more!
Every AI project I’ve worked on follows the 80–20 power law. 80% of the project can be completed with 20% of the complexity. Complexity always and inevitably seems to skyrocket.
To avoid this, let’s set up our project in a maintainable way and then add a few customizations.

Best Practice — 1: Production deployments
Be prepared for your prompt to change a lot. If you deploy your MyChatGPT to real users, you are going to find a lot of edge cases and get a lot of feature requests. These will creep into your prompt and you will find yourself with hundreds of new versions. The first step to maintainability is to be intentional when selecting the stable production version.
We are using PromptLayer, so we can just label our best version with prod as shown below.
After marking a version with the release label, all we need to do is update the line of our code that grabs the template to specify prod instead of latest.
mychatgpt_prompt = promptlayer_client.templates.get("MyChatGPT", {
    "provider": "openai",
    "input_variables": {
        "question": user_input,
        "label": "prod" # If we don't specify a label, it grabs latest
    }
})
Best Practice—2: Snippets
One organizational strategy, that I have learned from our customers at PromptLayer, is modular prompting. This is the process where you separate a prompt into multiple discrete sections (we call them snippets).
Snippets are great if you have a common definition repeated throughout your prompts (for example, a HIPAA compliance preamble). They are also useful to allow non-technical stakeholders to edit prompts without risking that they change some important parts of the prompt (for example XML output formatting or function definitions).
In PromptLayer, you can use the “@” button to import a snippet into your prompt (see more).
Best Practice — 3: Regression tests
If you have followed along with this tutorial, you now are tracking LLM inferences, versioning prompt changes, and logging user inputs. The only problem is… how do you know your newest prompt edit won’t break old use-cases? This deserves a whole best practices blog post on its own.
To me, eval engineering is actually a part of the prompt engineering process. Your evaluation pipeline will likely need to be tailored specifically to the prompt itself, and you will need to iterate on it as you build. For now, we can use PromptLayer to set up a backtest to run new prompt versions against historical outputs. Learn more about this here.
Conclusion
In this tutorial, we built a custom ChatGPT-like AI assistant from scratch, covering key aspects such as prompt engineering, chat interface development, contextual enhancement, and capability augmentation. We also explored best practices for efficient and maintainable development, including release management, modular prompting, and regression testing.
To learn more about PromptLayer, sign up at www.promptlayer.com or check out our blog post “Best practices: Prompt management and collaboration.”
Happy prompting 🍰
PromptLayer is the most popular platform for prompt engineering, management, and evaluation. Teams use PromptLayer to build AI applications with domain knowledge.
Made in NYC 🗽 Sign up for free at www.promptlayer.com 🍰